Qoyod Integration — Customer Guide
Purpose: A clear, step-by-step guide for SiFi customers to connect their Qoyod Accounting system to SiFi and start syncing transactions.
Getting Started
You can now use SiFi’s integration with Qoyod to directly push transactions as Draft Journal Entries into Qoyod.
Before you begin:
- You will need an API key from Qoyod to set up this integration
- To generate an API key in Qoyod, go to Settings > General Settings > API Key and click on the button labelled ‘Generate New Key’.
- Confirm your Chart of Accounts is up to date.
Integration Overview
The integration process happens in two main steps:
- Sync configuration data from Qoyod to SiFi(Chat of Accounts). This step can only be performed by users with the Admin or Finance Manager role in SiFi
- Sync transactions from SiFi to Qoyod as draft journal entries. This step can be done by users with the Accountant role in addition to Admin and Finance Manager.
Integration Steps
Step 1 — Log in to Qoyod
- Go to your Qoyod and sign in with your admin account.
Step 2 — Start the Integration in SiFi
- In your SiFi account, go to Settings → Integrations.
- Select Qoyod from the available integrations.
- Click Connect.
Step 3 — Authorize Access and Connect to Qoyod
- You will be redirected to an authorization process.
- We request only the permissions necessary for the integration:
- Read access: organization details, accounts, and vendors.
- Write access: journal entries, documents
- Review the permissions and click Accept.
- After authorization, you will need to connect SiFi to your Qoyod instance by providing the following details:
- API Key — A unique key used to authenticate SiFi with Qoyod(as explained above).
Step 4 — Select Attributes to Sync
- Once connected, you’ll be prompted to choose which attributes from Odoo you want to sync into SiFi.
- Accounts: Mandatory, these must be synced for the integration to work.
- Once selected, click Continue. This step may take a moment while the system syncs, the time needed will depend on the size of your Chart of Accounts.
Step 5 — Review Your Configuration
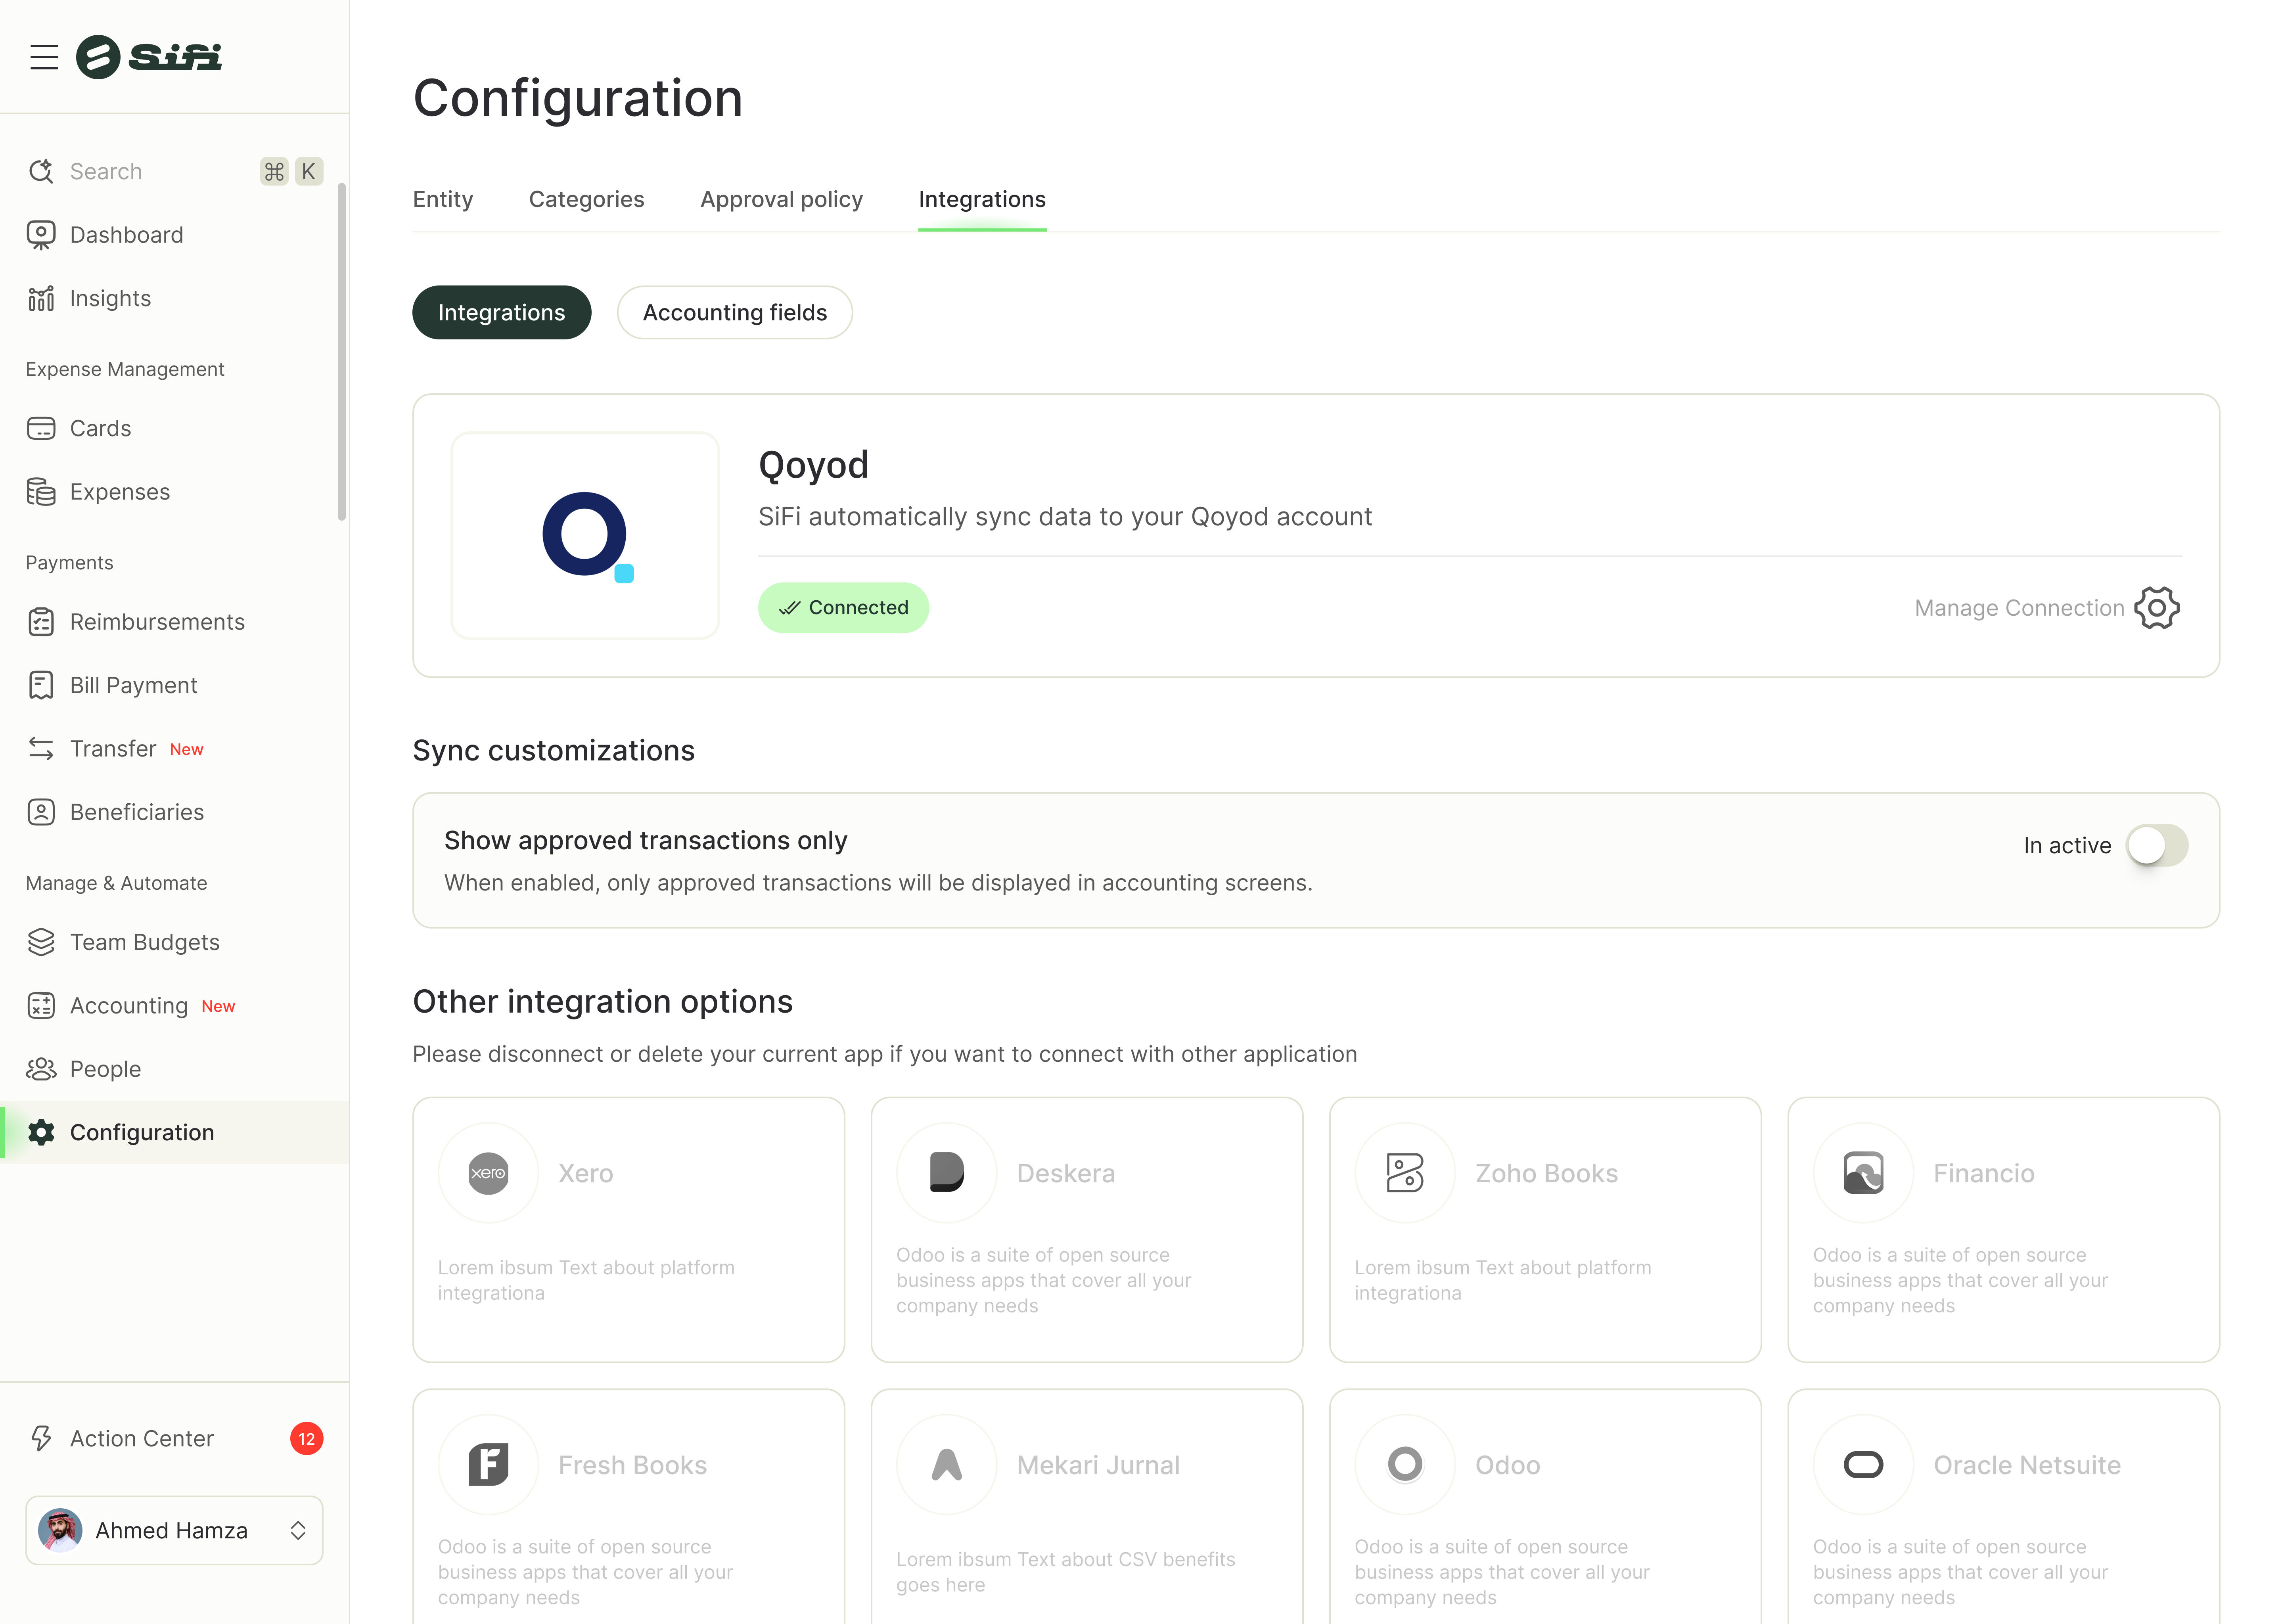
- After the sync completes, you will be taken to your Integration Configuration page.
- Here, you’ll see the synced attributes(Chart of Accounts) from Qoyod displayed.
- Set your Source Account : The Source Account is the Qoyod account linked to your SiFi wallet. All expense transactions exported from SiFi are credited to this account because it represents the funding source from which the expenses were originally paid. Crediting expenses to this account ensures that balances in Qoyod accurately reflect the movement of funds from your SiFi wallet.
- An Auto Sync option is available, enabling this will automatically refresh your configurations daily without any manual action, keeping SiFi in sync with your Qoyod tenant.
- Now your configuration is complete.
Step 6 — Explore the Accounting Menu
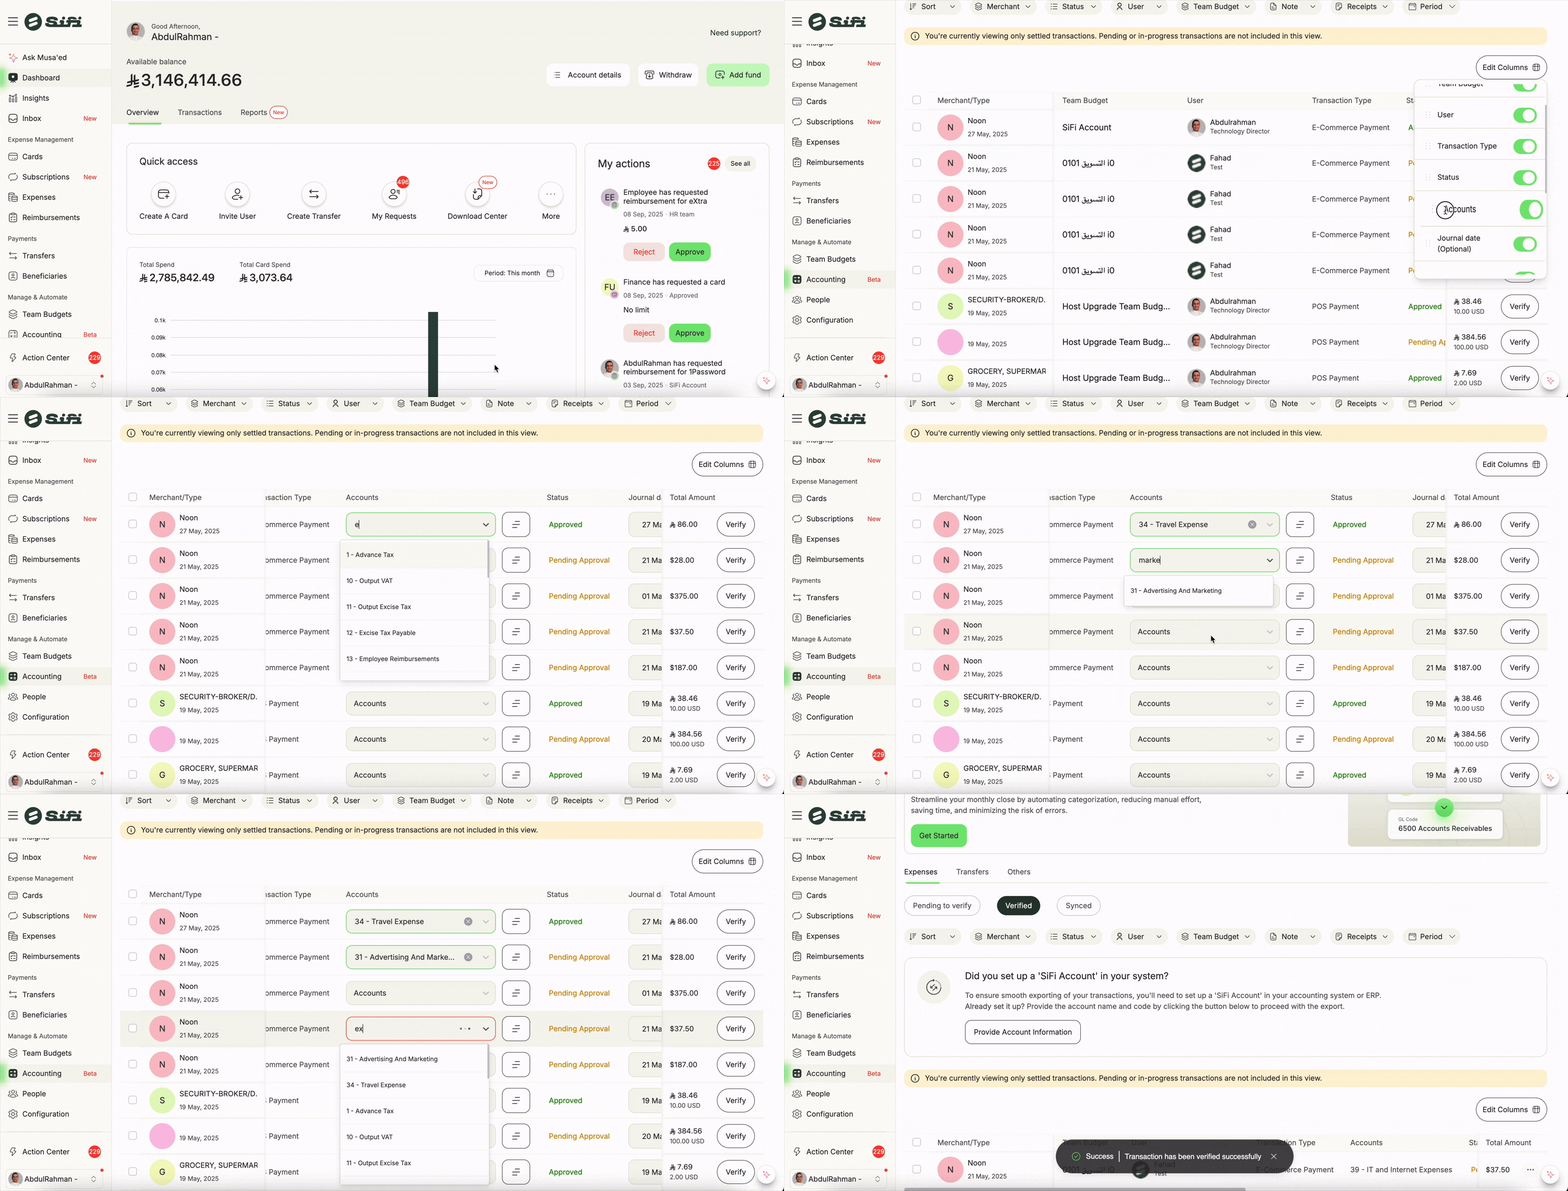
- Go to the Accounting menu in the SiFi sidebar.
- This tab is available to users with Admin, Finance Manager, and Accountant roles.
- In this section, you will see:
- Expenses: This contains your card expenses.
- Transfers: Includes transfers and reimbursements.
- Others: Covers cash-in and cash-out transactions.
- Filters: Use the standard filter options to focus on the transactions you want to review.
Step 7 — Verify Transactions
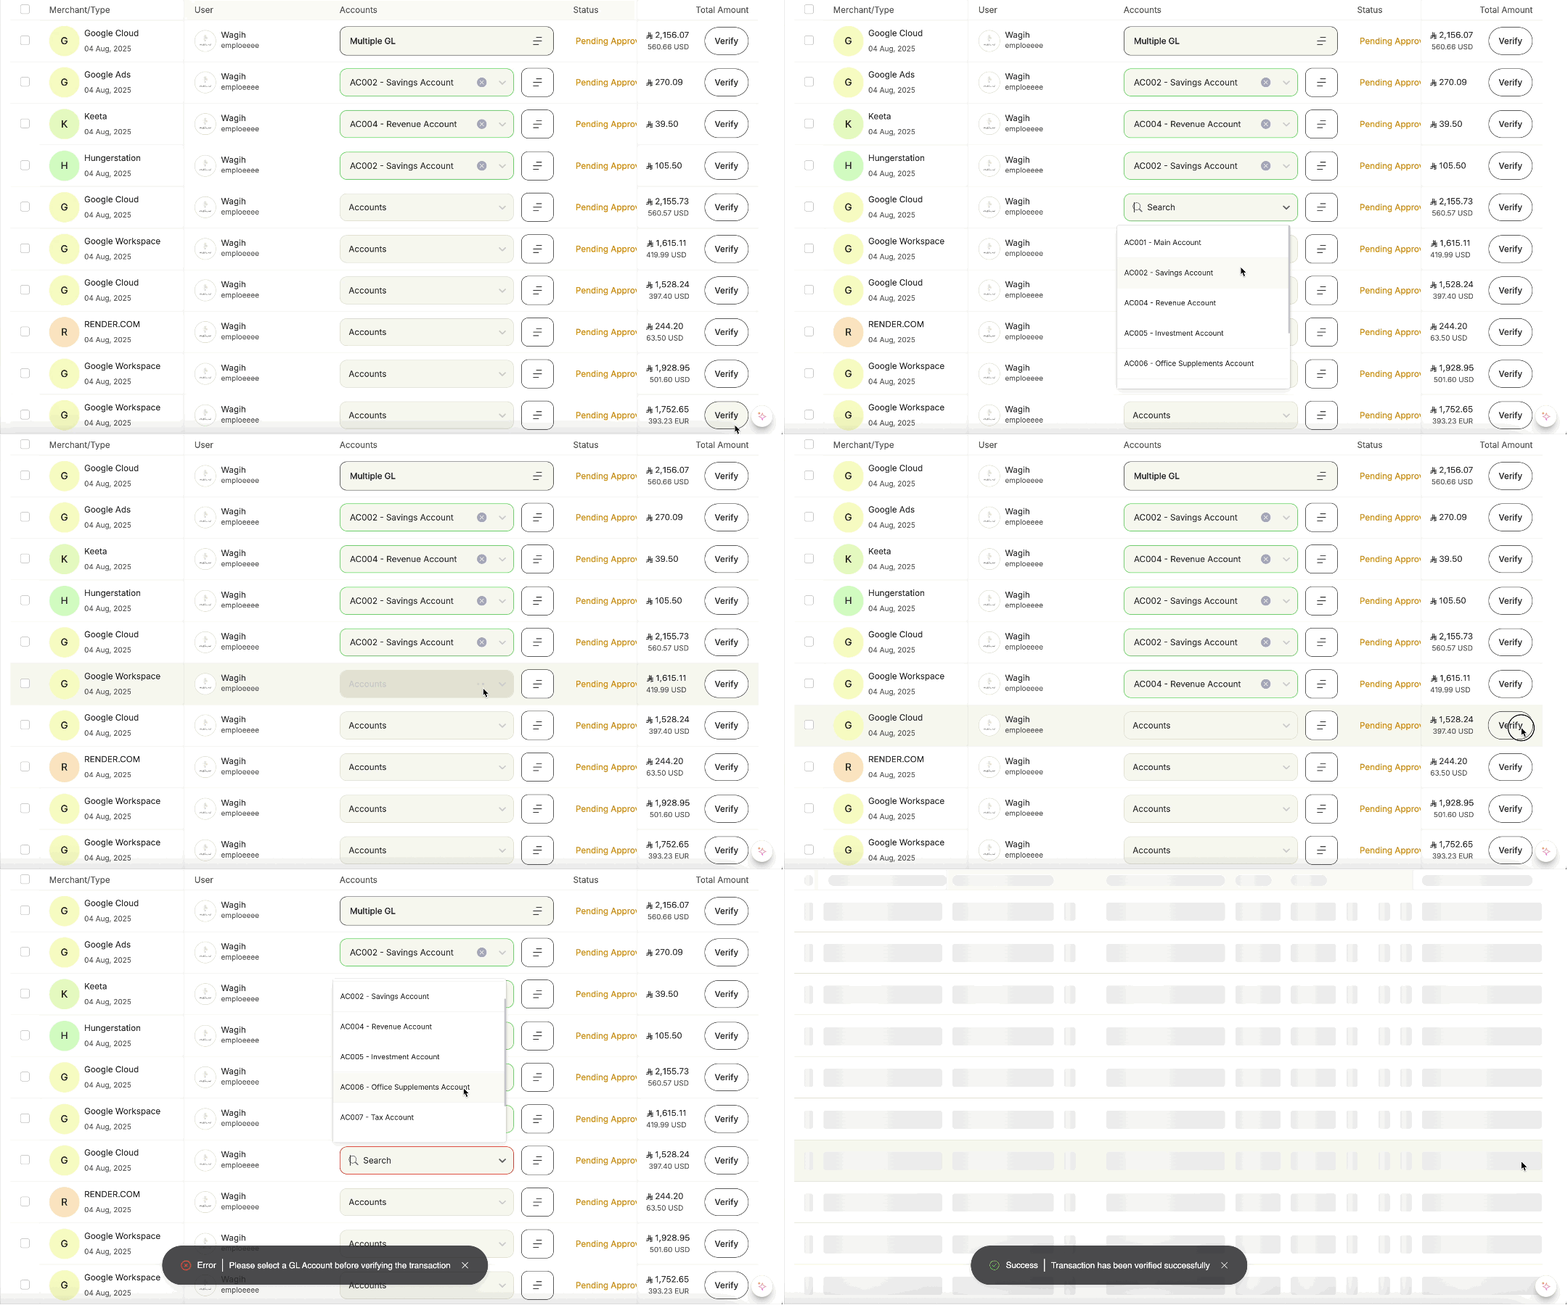
- To verify transactions, you need to assign at least an account to each transaction.
- The account you assign will correspond to the transaction direction:
- For debit transactions, you assign the debit account.
- For credit transactions, you assign the credit account.
- The opposite side is automatically set to your Source Account configured in Step 5.
- SiFi provides a bulk action option to assign accounts to multiple transactions at once.
- For example, you can filter transactions by a budget, such as Budget = "Marketing Campaign 2025", and bulk assign all these transactions to the account Marketing Expenses.
- All verified transactions will be moved to the Verified tab for easy tracking.
- This bulk assignment saves time and ensures consistent accounting.
- Always review assigned accounts before completing verification.
Step 8 — Sync Transactions
- Once you finish verifying your transactions for the week (by employee, budget, or whatever logic works for you), you can sync all at once.
- Syncing is done as journal entries
- Each transaction will create one corresponding journal entry in Qoyod.
- Voilà, all transaction details and supporting documents will be added to Qoyod automatically.
Related Articles
Odoo Integration — Customer Guide
Purpose: A clear, step-by-step guide for SiFi customers to connect their Odoo Accounting system to SiFi and start syncing transactions. Getting Started Before you begin: Create a dedicated Odoo user for this integration: This will help you clearly ...Zoho Books Integration — Customer Guide
Purpose: A clear, step-by-step guide for SiFi customers to connect their Zoho Books Accounting system to SiFi and start syncing transactions. Getting Started Before you begin: Create a dedicated Web Services User for this integration: This will help ...SiFi-Wafeq Integration - User Guide
Purpose: A clear, step-by-step guide for SiFi customers to connect their Wafeq accounting system to SiFi and start syncing transactions. Getting Started Before you begin: Create a dedicated Wafeq user for this integration: This will help you clearly ...Odoo Integration with SiFi
A clear, step-by-step guide for SiFi customers to connect their Odoo accounting system to SiFi and start syncing transactions. Getting Started Before you begin: Create a dedicated Odoo user for this integration: This will help you clearly identify ...🔗 Connecting Zoho Books with SiFi
A clear, step-by-step guide for SiFi customers to connect their Zoho Books account to SiFi and start syncing transactions. Getting Started Before you begin: Create a dedicated Zoho Books user for this integration: This will help you clearly identify ...